Interactive "Merry-Go-Round" Card

Welcome to my next adventure in interactive cards!
The circle of transportation icons circles the sentiment like a Merry-Go-Round.

I saw an example of this card quite a while back, right after the Stampin Up Sliding Star dies first appeared in the catalog.  Now that I have some time to create and play, here goes ....

Supplies
  • Stamps:  Stampin Up En Route
  • Dies: Stampin Up Sliding Star, Layering Circles
  • Inks: Stampin Up Lovely Lipstick, Grapefruit Grove, Pineapple Punch, Call Me Clover, Blueberry Bushel, Highland Heather, Basic Black
  • Cardstock: Stampin Up Whisper White
  • Pattern Paper:  Stampin Up Going Places DSP
  • Misc: adhesive sheet, fun foam, stampin' dimensionals

Steps
  • Cut 6 small circles from white cardstock and color them with ink.  Looking back, I could have just cut each circle from colored cardstock but I had ink blending on my mind, so ink blending I did.  😀 


  • Cut the sliding circular track out of the front panel.  Since I wanted to use Designer Series Paper (DSP) that was pretty thin, I cut the track in both the DSP and a cardstock panel and glued the two cut pieces together.  Save the cut ring.  I glued the DSP ring to the cardstock ring for more stability.  NOTE:  If you don't have the Sliding Star dies, you can use two circle dies that have a radius difference of about 1/2".
  • Adhere buttons or coins to ring with dimensionals.  I stacked two under each button so the ring would be slightly higher than the front panel.


  • Cut a circle for the center sentiment that is slightly smaller than the circle from the sliding circular track die.  At first, I tried to use the circle from the track die but there was a lot of rubbing so I cut a slightly smaller circle out of the original circle. 
  • Stamp sentiment on circle.  I used white cardstock for my circle but since my DSP was antique colored, I probably should have used Stampin Up Very Vanilla. 
  • Attach adhesive sheet to fun foam and run through Big Shot to guarantee it is stuck well.
  • Cut two circles from adhesive fun foam that are smaller than the sentiment circle.  There needs to be enough overhang for the edge of the button or coin to fit into.  
  • Adhere the two adhesive fun foam circles together then adhere them to the sentiment circle.
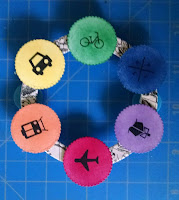


  • Adhere foam to back of cardstock panel.  Around the circle opening, make sure to leave enough overhang for the edge of the button or coin to fit into.
  

  • Adhere the stamped, colored circles to the non-button side of ring.


  • Adhere the cardstock panel to a card base.
  • Place the ring with button side toward the card base into the hole of the panel.
  • Adhere the sentiment circle to the card base, centered in the hole of the panel.  I used glue to adhere the sentiment circle to the card base and let it dry thoroughly with a heavy object on it because I didn't trust my tape runner to be strong enough on the foam.  If the circles on the ring get in the way of adhering the sentiment circle to the card base, you can glue the sentiment circle FIRST and THEN tuck the buttons of the ring into the track although this is trickier to do.

  Ta Da!
You now have a lovely Merry-Go-Round interactive card.
Thanks for visiting!


Comments

Popular posts from this blog

St. Patrick's Day

Hello! Still creating at the last minute, I recently created family St Patrick's Day cards.  I used a previously saved pin by Shannon White posted on the Taylored Expressions site as inspiration and combined that with the   Freshly Made Sketches  # 366 design.  I think it turned out pretty good but not quite as "polished" as I like.  I guess they can't all be super winners. 😐 I had fun "shopping my stash" to create this.  I am trying super hard to not buy more crafting stuff until I use some of what I already have.  I tend to buy things and never take the time to use them.  There are just so many cute and neat things out there in the crafty world.  Eeeks! For the inside sentiment, I printed an Irish blessing onto cardstock and adhered it inside each card. May your mornings bring joy And your evenings bring peace. May your troubles grow less As your blessings increase. Card Recipe Stamps:  SSS Gnome Lucky Punches & Dies: ...

Harry Potter Birthday Surprise

Another interactive card for a grandchild... My grandchildren love Harry Potter so I decided to create a card around that AND add an interactive element. Quite a while ago, I bought a Confetti Flinger die set so I finally made the time to figure it out.  It took me a few trials and failures but I finally got the flinger to work.  Yay!  The keys seem to be making sure the shorter end of the flinger is at the bottom and using glassine paper to hold the confetti. I had to cut up a postage stamp envelope since I didn't have any glassine in my craft supplies. I was so so excited when I got it to fling reliably.  To help keep everything together until he has it in his hands, I put a little bit of temporary adhesive on the corners.  hee hee For the front design, I wanted a bouquet of balloons but with the Harry Potter twist.  I bought and downloaded some clipart and then used the design from Freshly Made Sketches #FMS362. I really like the end result.  What ...

Bicycling Fun

At my previous house, I did NOT have a very good system of storing ephemera and embellishments and washi tape, so I seldom used them, I just forgot I had them.   I had just been working on sorting and organizing my craft room after our recent move, when my husband asked if I would make a funny get well card for his friend who recently wiped out on a bicycle. While looking for bicycle stamps and dies, I realized there was an adorable bicycle stamp set where I hadn't used all the stamps.  Some ideas came to mind for cards with this partially used stamp set and the recently discovered washi tape, ephemera and card bases.   This card was one of the results.  I still haven't used all the stamps in the set because I ran out of room on the card.  😂 I followed a saved design from Freshly Made Sketches , #FMS353.  I posted this card in the splitcoaststampers gallery and it was selected as a splitcoaststamper Weekly Favorite on April 7, 2024.  I am s...